Car Customization
Technical Document PDF - https://drive.google.com/file/d/1-TGgzM_ceiCXrAy7P62S_vo8ypmiVF9p/view?usp=shari...
Assets Used:
List all art/sound/library/etc assets used in your solution
- Retro Cartoon Cars - Cidada asset from RCC Design https://assetstore.unity.com/packages/3d/vehicles/land/retro-cartoon-cars-cicada-96158
- DrivenDecals - https://github.com/Anatta336/driven-decals/blob/master/Documentation~/DrivenDecals.md#creating-your-own-decals
- Flexible Color Picker - https://assetstore.unity.com/packages/tools/gui/flexible-color-picker-150497
- Gran Turismo 4 Soundtrack: Arcade Mode - https://www.youtube.com/watch?v=eKAhu7DyZN8
- Universal Accessories - https://assetstore.unity.com/packages/3d/props/free-universal-accessories-asset-pack-141691
Video showing functionality: https://www.youtube.com/watch?v=0AQc8_B1mho&feature=youtu.be
Analysis:
Based on the required features, a few questions were asked:
- How much customization do we want to add to each system?
- How do we save the players prefab and load into the game?
- How do we handle the segmented textures of the car?
- Unity has an easy decal system. How do we want to customize the car with it though?
Approach:
After research and testing color , decal, and ornament systems, the following approach was chosen:
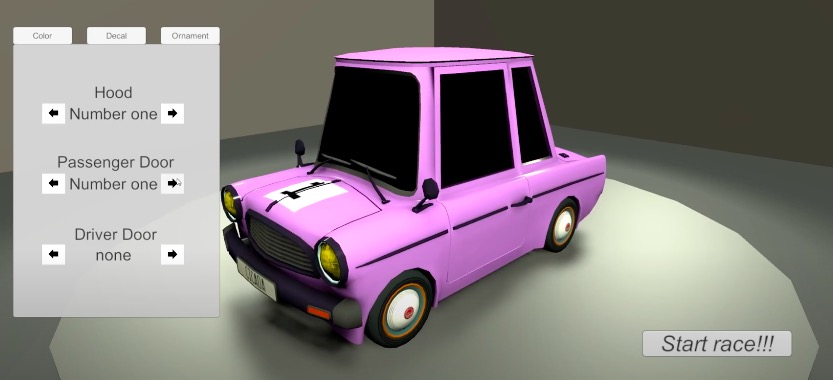
- UI
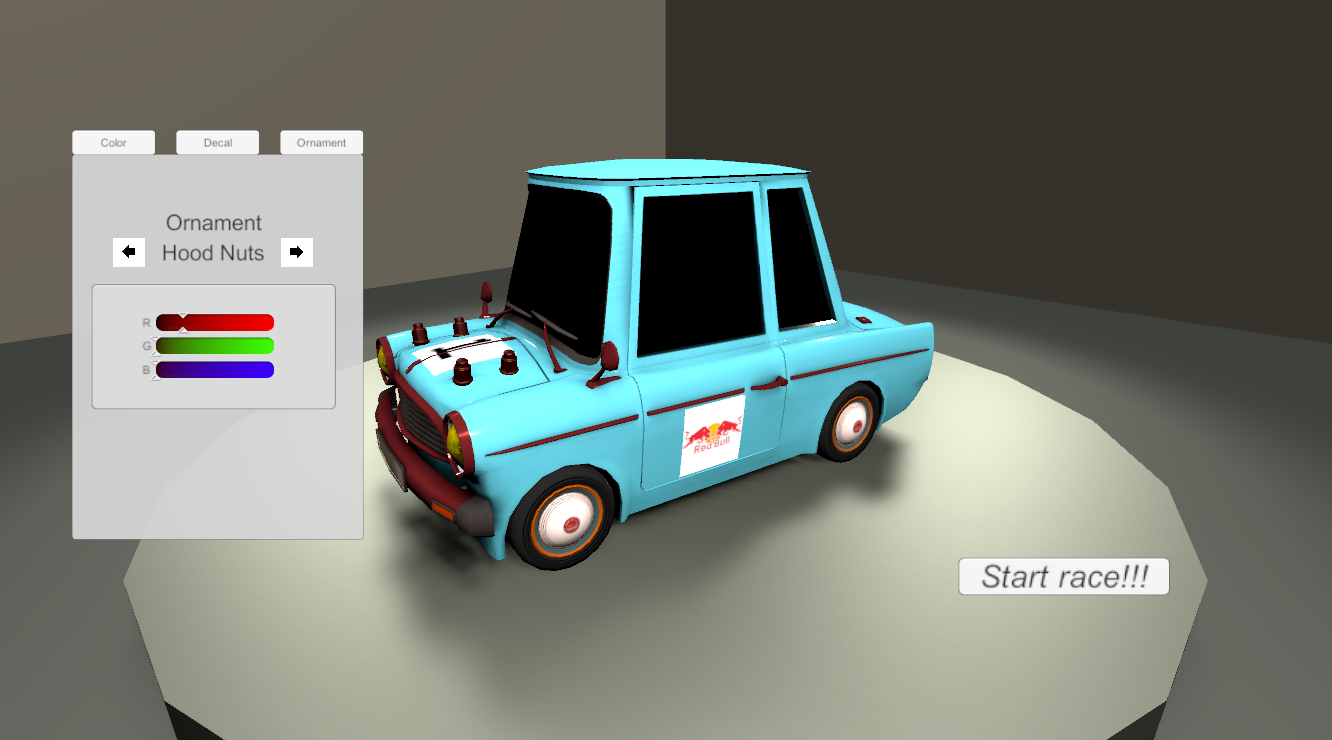
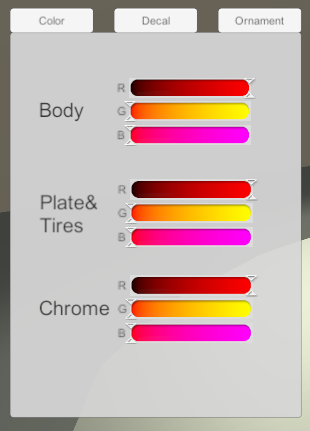
- Our UI has tabs that separate the three systems into three different menus. Using the Unity canvas, we include buttons that allow the user to cycle through the different decal and ornament options and display the name of the currently displayed items. For the colors, there are sliders that indicate the RGB values that directly modify the material colors.
- Custom Color System
- The approach was to have a color picker that allows the player to change the surface shader. At first, I tried to use the shader graph to connect the texture of the car. I also have the value for RGB setup and the hue of the texture that allows the player to use the slider to change the value. The result is not coming out as I want it. Instead, I found a color picker on Unity asset store to modify it and implement it to the scene. This works very similar to what I tried to do before. I put the slider for each RGB color, each slider has a different color texture. The car asset itself separates into different parts. I connected different sliders to different material of the car to allow the player to custom different color schemes of the parts. Using the slider would update the material color in the scene.
- Script - ApplyColor
- Link the material of the car and slider, then update the material color as the color texture on the slider.
- Decal System
- The overall approach was to have sets of decals on the car that the player could cycle through. To implement the decal system, we used the plugin DrivenDecals. I found this during my initial research when looking how to implement decals while using URP. I chose URP at first because I was most familiar with it but I later realized the HDRP had a built in decal system that works similarly to the DrivenDecals plugin but at that point I had gotten my system working. There are four different places where a decal can go and four choices of decals to choose from. Each decal location controls which decal is chosen independently with the decal_car script.
- Script - decal_car
- Handles keeping track of the decals on the car which is currently selected to be rendered
- Saves player preferences using the PlayPref functions
- Script - decal_manager
- Controls communication between the UI and decal on the car
- Ornament system
- The ornament system follows the same implementation as the decal system. Using the decal_car and decal_manager scripts, the decal_car keeps track of the ornaments that are available and the player’s selection.
- Saving and Loading
- There are two different types of information about the car that we needed to keep track of, the color of the materials and decals/ornaments selected. The materials were easy enough to save as the material would keep track of the color change by itself across scenes. However, saving the preferences of the user for decals/ornaments proved to be more difficult. Because my approach to select decals/ornaments was to activate/disable them, I used the PlayerPref functions to save what is currently active when the player loads the next scene.
- Saving and loading is handled in the decal_car script
Breakdown of Approach:
UI System -
The three buttons at the top are tabs that control which customization option is to be viewed.


Color system -
The custom color system is using the slider and assigning color value and texture onto the slider. Each slider has a different color texture.

The car asset itself separates into different parts. I linked the different sliders to different materials of the car, then have a script that updates the material color to the color texture on the slides as the player moves the slider to a certain position of the slider. So that player could custom different color schemes of the parts.
Decal System -
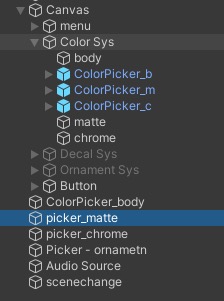
The decal system has three preset locations that you can spray paint on the car. The image below shows the hierarchy of the decal system. Each location - front, driver, and passenger - have the decal_car script attached.

To project images onto the car, I used the DrivenDecals plugin. It works similarly to the HDRP decal projector. After projecting 4 different decals on the car,


Ornament System -
Since the ornament system uses the same scripts as the decal system, there is not much more to add.

The ornaments are imported from a unity asset store pack that has car ornaments. The red arrows in the picture below point to the four different ornaments that are placed around the car. The UI will allow the user to toggle one ornament at a time.

Saving and Loading -
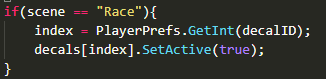
PlayerPrefs saves specified data to disk for access later. In the decal_car script, I save whenever the user changes a decal

To load the, if the scene is the race scene then we read the data from disk and activate the specified objects. I did encounter problems when trying to instantiate the prefab in the scene as the decal projector would not run in realtime, so I had to have the prefab already in the scene and project the decals beforehand.
Leave a comment
Log in with itch.io to leave a comment.